Wednesday, November 19, 2014
Sunday, August 5, 2012
Ugly Fat Quarter Class
I dunno. I think all fabric has something to like about it. Some may be more of an acquired taste, while some may just not be your style. Others are just difficult to work with...maybe for a color, design or size problem. While I adore Kaffe Fassett fabric, one of my favorite quilts made from it had my husband comment: While there are many aspects of it that I appreciate, looking at it is not one of them. Talk about a diplomat...but what he was really saying was that the quilt was UGLY!
When my quilt guild was looking for new programs for next year, we talked about having a class based on using up some ugly fabric. The class evolved to be an ugly fat quarter class. So I got to work designing a pattern that would use but not hide an ugly (or difficult to use) fat quarter. I'll be posting photos and instructions soon...but until then, I'd love to see your ugly fat quarters that you'd like to use up...and ship out! Or, maybe fall in love with all over again and keep for the winter!
Thursday, July 19, 2012
Starting a New Quilt
I've always admired Sunshine and Shadow quilts...especially Amish ones. And I've always wanted to try one. I even have Eleanor Burns' book on how to make one in a day...but I can't find it!
Plus...the fabric I want to use isn't strip friendly...it's boxes of berries, and I have to fussy cut. So, in for a dime, in for a dollar...I'm making it from 2 1/2" squares.
Here's a first look as I'm putting it together...what do you think? I'll post more as it gets put together. One of the joys of doing a quilt this way is that you can rearrange the pieces easily because they don't get sewn together in strips.
Monday, July 16, 2012
A Wizard of Oz Quilt
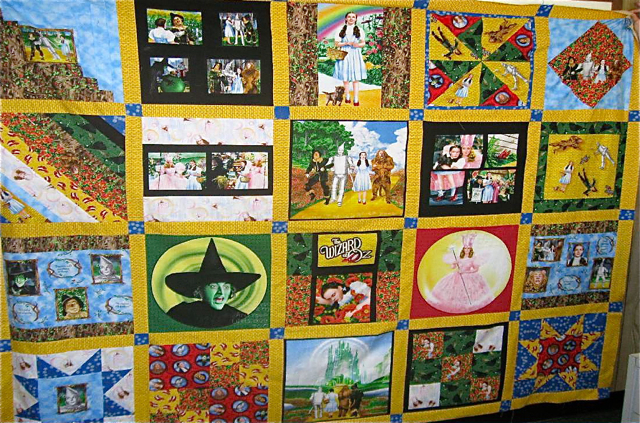
A friend of mine has a quilt shop, and I loved hanging out in the store and quilting the day away whenever possible! One day, a Jackie came by with a special project. Her husband adored The Wizard of Oz, and she had been secretly buying up Wizard of Oz fabric to make him an anniversary quilt. Trouble was, she wanted to have an original quilt, and showcase all the fabulous fabrics, but she couldn't find a pattern that worked across the board!
It seemed the only solution was to make a custom quilt, and I jumped at the change to help design the quilt. There really weren't any rules: just to make sure that the best parts of the fabrics came through and that the quilt was instantly recognized as The Wizard of Oz.
Some of the fabrics had large images, such as the Wicked Witch, Glinda, and the Emerald City. They dictated the size of the blocks. Other small scale fabrics included plain yellow brick road, ruby slippers on the yellow brick road, fields of poppies, Wicked Witches on dark green, circles with characters on red, quotes, smaller portraits, apple tree fabric, wands on deep blue, Glinda floating in her bubble, Dorothy, Scarecrow, the Tin Man and the Cowardly Lion swirling on the yellow brick road...and film strips with different movie scenes...the list was extensive!
Every block of this quilt involved Jackie's decision making. My part was to figure out how best to fussy cut the fabric, and what kinds of blocks would show off this amazing fabric!
Of course, it was easy to turn the yellow brick road into sashing! It just seemed to make sense! We needed some contrast for the cornerstones, and we didn't want to have bits and pieces of the characters cut off...so the magic wand fabric was the choice! To keep the character of the film strips, we bordered two of the blocks with black to make them the right size. Whenever there was a few inches or more, we incorporated as many different fabrics as we could. the block made from diagonal strips is one way wer tried to show some of the different fabrics in the quilt.
One of the biggest challenges for me was that the fabric had so many colors...I loved the rich reds, greens, yellows and browsn, but the pastels threw me for a loop or two!
The pinwheel block in the top row was one of the biggest challenges...the fussy cutting was especially important so the 4 main characters were shown in their entireties. You can see what the fabric looked like at the start in the block diagonally down and to the right of the pinwheel block.
Once finished, Jackie embellished some of the blocks with beads and embroidery, and her husband was THRILLED!
Sunday, July 8, 2012
Vintage Silk Tie Quilt
It's been a while since I've posted, mostly because I've been struggling to finish a few projects! Here is one of them: a friend asked me to layer and quilt a quilt top she had purchased at a garage sale. It was one of those quilts made from old ties. It was small, she said. It sounded like I would enjoy the project. It was all triangles, and I thought for a while about the best way to free motion quilt it. Of course there were complications: not enough batting, having to sew the backing together, and all the triangles were hand-sewn! It was a nice experience connecting with someone else's work, but over time the triangles had stretched, and it was difficult to get the quilt top smooth. Plus, the quilt measured 78" x 61"...not small at ALL! Here are the results (the friend has to tack the binding still)!
Labels:
men's tie quilt,
quilt top,
silk tie quilt,
tie quilt,
vintage quilt
Monday, November 28, 2011
An Easy Log Cabin Quilt in Black, Bright
and Even Rainbow Fabric!
Anyone who's ever gone shopping with a 6-year-old is almost guaranteed to have some rainbow fabric in her stash! You almost promise them anything if they will just be patient while you finish looking at fabric. Then, once you have their rainbow fabric, you start collecting small amounts of coordinating fabric...the only trouble is, it never really does go together! Enter this simple Log Cabin quilt that uses up that rainbow fabric, as well as some fun bright fabric you'd never get to use anywhere else...
This quilt is based on 16 identical Log Cabin blocks. The center square starts off as a 4" square, and the strips are 2 1/2". divide four remaining fabrics into darker and lighter pairs, and start your log cabin going around the center square with the lightest fabric first, progressing to the darkest fabric. For this quilt, you will use the same fabric going around the Log Cabin for the second row as well. I did take the time to line up the rainbow print to give it a continuity in the design. That is what makes the pinwheel stand out as much as it does.
Arrange the blocks in swirls, or create your own arrangement. add contrasting borders, and you have a fun quilt any 6-year-old or even 16-year-old will love.
This quilt is based on 16 identical Log Cabin blocks. The center square starts off as a 4" square, and the strips are 2 1/2". divide four remaining fabrics into darker and lighter pairs, and start your log cabin going around the center square with the lightest fabric first, progressing to the darkest fabric. For this quilt, you will use the same fabric going around the Log Cabin for the second row as well. I did take the time to line up the rainbow print to give it a continuity in the design. That is what makes the pinwheel stand out as much as it does.
Arrange the blocks in swirls, or create your own arrangement. add contrasting borders, and you have a fun quilt any 6-year-old or even 16-year-old will love.
Labels:
16 block quilts,
bright fabric,
log cabin,
rainbow fabric
Monday, November 21, 2011
Flannel Floral Folkart Quilt
As a new quilter, I had no idea that flannel was more difficult to work with in a quilt than plain old cotton fabric. It's bulkier, less stable and it tends to shift, so piecing can be challenging, I did have the sense to pre-shrink the fabric though!
After several visits to one of my favorite local quilt shops Sew What's New in Islip, NY (pssssst...they are usually open on Sundays!) I had to buy some of the floral flannel fabrics that had been catching my eye. I bought a quarter yard of some of them, and about a yard of the main print, which was about four vertical rows of 2 1/2" floral stripes with large motifs lined up between those rows, a couple of coordinating solids, and a coordinating mini print that looked like mini 1" log cabins. Now, what do do with it!
I am not exaggerating when I say that I poured over patterns for MONTHS, maybe even YEARS before I came upon a book that seemed to help...Two-Block Theme Quilts by Claudia Olsen. This book had many ideas, and with a little adjustment and creativity, I was able to come up with a plan for a quilt that not only showcased the large flannel motifs, but also had some fun and movement in it. As you can see by the small quilt (crib size), the small amounts of fabric I had purchased required coing some of the star blocks in red, and some of them in blue.
To finish the quilt, I added a lime green border and stippled the whole quilt. It is technically a UFO, since it hasn't had it's binding added yet (it will be yellow) but I'm pleased with the results. One word of warning...a flannel quilt backed in flannel and filled with cotton batting weighs a TON!
Have you worked with flannel in your quilts? Was it what you expected? I'd love to hear about it!
After several visits to one of my favorite local quilt shops Sew What's New in Islip, NY (pssssst...they are usually open on Sundays!) I had to buy some of the floral flannel fabrics that had been catching my eye. I bought a quarter yard of some of them, and about a yard of the main print, which was about four vertical rows of 2 1/2" floral stripes with large motifs lined up between those rows, a couple of coordinating solids, and a coordinating mini print that looked like mini 1" log cabins. Now, what do do with it!
I am not exaggerating when I say that I poured over patterns for MONTHS, maybe even YEARS before I came upon a book that seemed to help...Two-Block Theme Quilts by Claudia Olsen. This book had many ideas, and with a little adjustment and creativity, I was able to come up with a plan for a quilt that not only showcased the large flannel motifs, but also had some fun and movement in it. As you can see by the small quilt (crib size), the small amounts of fabric I had purchased required coing some of the star blocks in red, and some of them in blue.
To finish the quilt, I added a lime green border and stippled the whole quilt. It is technically a UFO, since it hasn't had it's binding added yet (it will be yellow) but I'm pleased with the results. One word of warning...a flannel quilt backed in flannel and filled with cotton batting weighs a TON!
Have you worked with flannel in your quilts? Was it what you expected? I'd love to hear about it!
Labels:
flannel fabric quilt,
Flannel quilt,
folkart fabric,
folkart quilt,
fussy cut,
two block quilt,
two block quilt designs
Tuesday, November 15, 2011
Turning Eight Fat Quarters Into Two Very Different Small Quilts
Sometimes those little bundles of fat quarters are just too adorable to pass up. I was reading a quilting novel, and the story involved a woman from Guatemala. In my head, the descriptions of the colorful fabrics centered on reds and yellows, so when I saw a little bundle of red fat quarters next to a little bundle of yellow fat quarters, each tied with a pretty ribbon at a local quilt show, I had to indulge! Here are the two quilts that came out of those fat quarters.

The quilt on the right was the first quilt,made in a simple pattern that I could imagine in Latin America.It was more difficult than I thought, because it has to be planned out to make the 4-part windmills fit together properly. To keep partial windmills from being on the quilt, I used a gold marble fabric. For the second quilt, I thought I'd add some white, to see if the colors would pop more. I'd never tried an Irish Chain pattern, so this was my first attempt. I definitely like the fabrics with the white added.

The quilt on the right was the first quilt,made in a simple pattern that I could imagine in Latin America.It was more difficult than I thought, because it has to be planned out to make the 4-part windmills fit together properly. To keep partial windmills from being on the quilt, I used a gold marble fabric. For the second quilt, I thought I'd add some white, to see if the colors would pop more. I'd never tried an Irish Chain pattern, so this was my first attempt. I definitely like the fabrics with the white added.
Friday, November 11, 2011
Hollyhock Fabric Makes a Sweet and Summery Quilt Perfect for a Garden Party
![]() |
| Coral "Heavenly Hollyhock" fabric by Northcott in an original quilt. |
At the time, I was a relatively new quilter, and did almost everything in 12 1/12" blocks, thinking it would be easier to find help if I messed up on a standard size!
Labels:
fabric panels,
hollyhock fabric,
hollyhocks,
kaleidoscope quilts,
large floral fabric,
large prints,
lattice,
Northcott,
sashing,
working with large prints
Monday, November 7, 2011
Easy Scrap Quilt with Floral Fabrics From Your Stash That Didn't Really Go Together at First Glance
Sometimes you have fabrics that you really like, but you don't have anything special to do with them. So, they sit, and you know they will most likely never leave your stash, especially if you only have small amounts of them. That's why it's important to go through your stash occasionally, enjoying and touching your fabrics.
For this quilt, I had several pretty floral prints, and just wanted to get them used up. The blocks in a sweet little Leisure Arts book, Wonderblocks by Terry Martin helped me on my way! Used copies are available online from Amazon I chose the big 12" blocks because I figured the quilt would be finished faster! To make this quilt simple, I cut a bunch of 4 1/2" strips, and further cut those into 12 1/2", 8 1/2", 6 1/2" and 4 1/2" pieces. If I had enough fabric, I cut a few 8 1/2" squares, but nothing bigger. I kept returning to my scraps for bits and pieces that would go with the quilt.
Labels:
coral fabric,
easy quilt,
easy quilt blocks,
easy quilts,
fabrics that don't go together,
floral fabric,
free motion feathers,
scrap quilt,
setting triangles,
using fabrics from your stash
Easy, Pretty, Vintage-Look Doll Quilt
This little quilt was a lot of fun. I'd been given some small pieces of 30's inspired fabric at about the same time my daughter fell in love with American Girl dolls. Once she "adopted" Samantha, of course we needed a doll quilt for her!
The quilt is based on 2 blocks, each miniaturized to 3" finished. The first block is a scrappy 9-patch. Small scraps of fabric were cut into 1 1/2" strips and sewn together in sets of 3. Sometimes there was very little fabric for the third strip, but that was OK with me...it just added to the "scrappiness!"
The sewn-together strips were rotary cut into 1 1/2" strips. Then, these 3-piece strips were arranged in groups of 3, and sewn together. Because they were so small, I finger pressed the seams to make them all nestle together when being sewn together.
Labels:
American Girl doll quilt,
easy quilts,
miniature quilt,
quilt designs,
quilt photos,
quilts,
stash,
stash ideas
Sunday, October 30, 2011
Half-Square Triangles with Blacks, Whites, Strawberries, Daisies and Baskets!
Fabrics with berries have always been a favorite of mine, and I couldn't resist the black and white fabrics with the bright red strawberries. I held on to them for a while, not sure what to do with them, but enjoying them immensely just the same.
One day, I saw a dynamic quilt in a magazine made out of half-square triangles, and thought I'd try it with this fabric. I pulled fabrics from my stash to go with the prints, and committed to a dark/light color scheme with black, white, red, green and yellow. Some browns were allowed in as part of the yellow family. No blues or purples thought! Here's the quilt...or part of it. The portion to the right represents about a quarter of the blocks that I have.
To start, the fabric was cut into 4 1/2" squares, a diagonal line was drawn on the backs of the lighter squares, and two lines were stitched on each square: each 1/4" from the line that was drawn.
One day, I saw a dynamic quilt in a magazine made out of half-square triangles, and thought I'd try it with this fabric. I pulled fabrics from my stash to go with the prints, and committed to a dark/light color scheme with black, white, red, green and yellow. Some browns were allowed in as part of the yellow family. No blues or purples thought! Here's the quilt...or part of it. The portion to the right represents about a quarter of the blocks that I have.
To start, the fabric was cut into 4 1/2" squares, a diagonal line was drawn on the backs of the lighter squares, and two lines were stitched on each square: each 1/4" from the line that was drawn.
Labels:
4 1/2 inch squares,
berry fabric,
black and white fabric,
bright colors,
easy quilt,
geometric quilts,
half-square triangles,
theme quilt
Thursday, October 27, 2011
A Classic Winnie the Pooh Baby Quilt When
Winnie the Pooh Fabric Was Hard to Find
Sometimes a baby quilt is just the project to get your quilt imagination going! But when my daughter Shannon's dance teacher of 10 years (since Shannon was 3!) was ready to have her longingly awaited baby, my joy at making a baby quilt quickly turned to panic...when I realized there just wasn't any Winnie the Pooh fabric in the quilt shops! And the dance teacher was absolutely set on having a Pooh-themed room...Classic Pooh, no less!
After scouring the internet, all I could find were a few fat quarters...and a yard or two for the back. I was almost going to buy them, when I went up and down the isles of a different JoAnn's than I usually visit. There, tucked in the juvenile prints, were one or two prints. I grabbed them! Happy to have anything with Pooh, I quickly chose some coordinating pastels. It seems the dance teacher was NOT making it easy on me at all, as she wanted to be surprised by the sex of her baby. Since one of the prints was green, I had no choice but to incorporate light blue, light pink, yellow, and a pastel rainbow stripe, as well as a small piece of gold fabric that I thought looked like the color of honey. It got a little complicated because I didn't want to use any floral fabrics...after all, what if the baby was a boy?
Labels:
baby quilt,
boy or girl baby quilt,
pastel quilt,
pooh quilt,
unisex baby quilt,
winnie the pooh,
winnie the pooh fabric,
winnie the pooh quilt
What to Do with Fabrics that Have a Little Bit of
Gold in Them
A friend who is a quilt shop owner had several fabrics that no one would buy.While each was very pretty, there was no related fabric to help tie them together. Adding to the problem, one was turquoise, one was lime, one was purple and one was orange. There just wasn't an easy way to make a traditional quilt with a purpose or a theme.
I wound up buying a half yard or so of each color, and thinking. What came to me was that they seemed kind of Moroccan...they had an overall exotic feeling to them. After working with the fabrics, particularly the turquoise and orange, and after getting acquainted with the gold metallic embellishment on the fabrics, I started referring to this as The Goldfish quilt. Probably a poor name, as even if you do see the fish shapes, they are starting to look to me more like kissing fish than goldfish!
Starting with a bunch of 2 1/2" strips, I sewed 36" 9-patch squares, and bordered each 9-patch block in 1 1/2" border fabric. I was trying to create a quilt that gave the overall impression of a tapestry...one that would be at home in a street stall in Marrakech or in ancient Baghdad.
I wound up buying a half yard or so of each color, and thinking. What came to me was that they seemed kind of Moroccan...they had an overall exotic feeling to them. After working with the fabrics, particularly the turquoise and orange, and after getting acquainted with the gold metallic embellishment on the fabrics, I started referring to this as The Goldfish quilt. Probably a poor name, as even if you do see the fish shapes, they are starting to look to me more like kissing fish than goldfish!
Starting with a bunch of 2 1/2" strips, I sewed 36" 9-patch squares, and bordered each 9-patch block in 1 1/2" border fabric. I was trying to create a quilt that gave the overall impression of a tapestry...one that would be at home in a street stall in Marrakech or in ancient Baghdad.
Labels:
bright color quilt,
exotic fabric,
fabric that doesn't go together,
gold fabric,
nine patch,
quilt,
quilt blog,
quilt idea,
quilter,
quilting
Tuesday, October 25, 2011
Berries, Bunnies and Bricks in a Cute Little Quilt!
Some of my favorite fabrics to collect are prints with berries on them. Raspberries, blueberries, strawberries....they all shout "buy me" when I pass by! This little quilt is handpieced...something to do while waiting for my daughter at ballet class. The pieces were cut by template...in the traditional old way.
The concept always made me smile...there would be bunnies looking to get into the berries, but they would always be separated from the objects of their desire by bricks, straw, baskets and fences. This project started my appreciation for "architectural" prints....those that would be a good choice for buildings and cottages in a quilt. It also has some complimentary foliage in a dark green color, an alligator print that I prefer to think of as paving stones, and some flowers that probably are not an accurate portrayal of blueberry flowers, but, so what?
Labels:
6 inch block; squares,
berry fabric,
blue fabric,
bunny fabric,
easy quilts,
green fabric,
hand pieced,
hand piecing,
quilt binding,
quilt ideas,
quilt piping,
small quilt,
template ideas
Monday, October 24, 2011
A Summer Quilt with Butterflies in Popsicle Colors
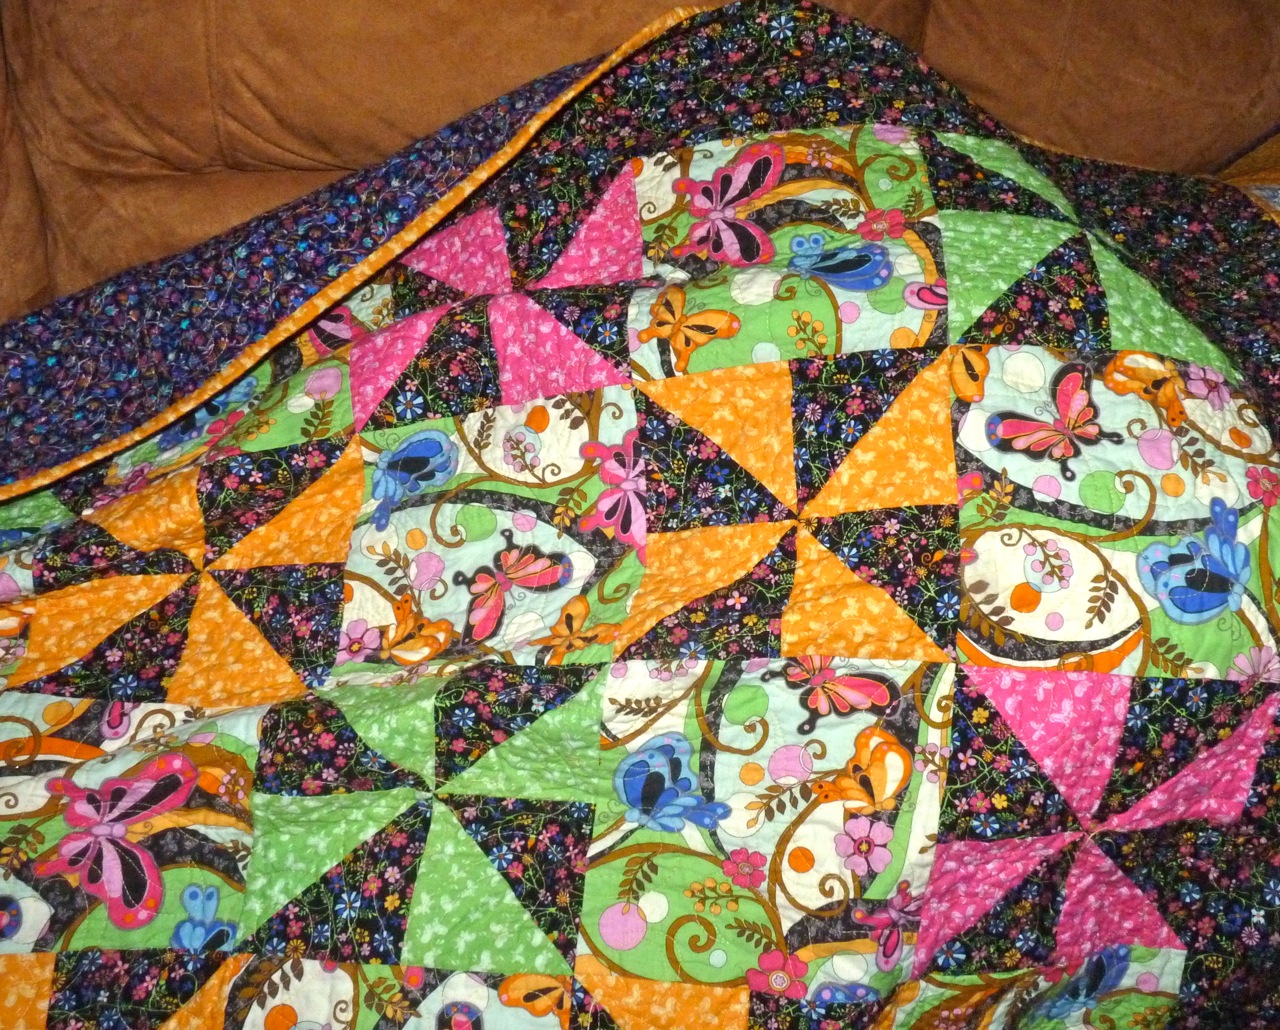
The first time I saw this fabric, the solids were placed next to each other, and my first thought was "Popsicles!" I really wished there were a blue fabric, too...to mix with some flip flop fabric for a beach quilt. I didn't have any luck finding the blue, but I did find the matching butterfly print, and I changed the idea to "Butterflies and Pinwheels.
It was a bit difficult to cut the print without slicing the butterflies in two....and I was lucky enough to find a dark fabric to mix with the popsicle bright fabrics. While I like the overall affect, and the quilt is cute, I think the butterflies got lost, and it does sort of end abruptly at the border. I still love the colors, though! Bright pink, lime and orange continue to make me think of those cold, drippy treats on hot summer days!
Labels:
bright color quilts,
bright fabric,
butterfly fabric,
easy quilts,
mixing fabrics,
pink prints,
pinwheel blocks,
quilt blog,
quilt ideas,
quilting,
quilting ideas,
summer quilts
Sunday, October 23, 2011
Sometimes Even the Prettiest Fabrics Make a Disappointing Quilt
Combinations of blues and greens in high quality fabrics are almost irresistible! So I couldn't walk past this Lakehouse fabric without getting a smidgen of several prints. Things were hectic, and I wanted to work with the fabric so much that I took a suggestion from a magazine and made a super large quilt block into a whole quilt. Here's how it came out:
I suppose it is OK, and it looks great as a table topper with a bowl of hydrangeas, white dishes and some cobalt blue vases, but all in all, I think the fabric would have been given more justice if the pieces were smaller.
If you do want to try your own, this is just 16 half-square triangles made up of 32 triangles: 4 dark blue, 8 floral, 8 stripe, and 12 white. Lay them out as shown, sew the triangles together, and join them to form the block. Border with complimentary fabric, and either miter the corners or use corner stones to make it simpler.
Labels:
blue and green fabric,
expensive fabric,
feather quilting,
floral,
half-square triangles,
lakehouse fabric,
stripes
Friday, October 21, 2011
A Bright and Geometric Scrap Quilt with Mostly
2 1/2" Strips
For the life of me, I don't understand why these blocks aren't called Square in a Square! But, they aren't...I'm not really sure if they have a name, but they are basically pattern for the first round of Courthouse Step blocks. The center squares were cut to 3 1/2" and the strips were sewn on opposite sides of that square, trimmed, then sewn in two rows across the top and bottom of the block. The block size is 7" finished.Of course, the quilt is perfect to create from your favorite fabric scraps...you only need 22" x 2 1/2" of fabric, in pieces as small as 7 1/2" (2 of them) and 2 1/2"(2 of them), which is just a strip cut on the long side of a fat quarter! In fact, a fat quarter will supply the outer square fabric for 7 blocks.
Labels:
bright fabrics,
easy quilt,
fat quarters,
jelly rolls,
quilt ideas fabric leftovers,
quilting,
scrap quilt,
scrappy quilt
Wednesday, October 19, 2011
Adding Weird Colors Like Olive and Mustard
to Your Quilts for Variety and Added Interest

I'm a huge fan of Kaffe Fassett fabrics. First, I love the colors and the designs. I especially like that the colors appear what I call "flat" -- meaning that there isn't any shading in any individual color. This works for me in a quilt, because when you find a different fabric with that same color, your quilt begins to pick up all kinds of movement that more delicate fabrics don't seem to have. The colors and designs are bold enough to create new design elements unique to your quilt! I also love the quality and feel of the Kaffe Fassett fabrics...they are thick and luxurious, and a joy to touch and work with.
I don't have many large pieces in my Kaffe stash...so I often have to come up with little challenges for myself. This quilt here has a number of challenges, as well as some odd colors I don't usually work with.
Labels:
kaffe fassett,
olive fabric,
quilt blog,
quilt challenge,
quilt design,
quilter,
quilting,
round robin quilt,
scrap quilt,
strange fabric,
ugly fabric
Tuesday, October 18, 2011
Some Ideas for the Novelty Fabric You Couldn't Resist!
I'm guilty! I bought an adorable novelty print of happy pigs on a farm. One is just cuter than the next! But what to do with it? I thought and thought, and came up with the idea of doing Hole in the Barn Door blocks using greens on the outer edges and woody print fabrics on the inside borders. I decided to do blocks of different sizes....either 6 1/2", 9 1/2", 12 1/2" or 18 1/2" so they would all go together. If I needed additional fabric filler, I was going to use a complimentary apple print, and reds and greens (including a red check to match one of the piggie's bibs!). I may put some Flying Geese blocks in, too. Here are a couple of the blocks:

There is a simple formula for figuring out how wide to make the strips on your blocks, as well as the half-square triangles for the corners....especially if you want regular sized blocks to put into a 6 1/2" or 12 1/2" format. In a nutshell, subtract 1/2" from the fussy cut piece. Then subtract that measurement from 6, 9, 12 or 18, whichever gives you a number between 4 and 8. Divide that number by 4, and add 1/2. This will be the size of the strips for the sides of the Hole in the Barn Door block. Go back and take the number again before you added the 1/2. Double it and add 7/8. This is the size of the squares you will need for the half-square triangle corners. Let me know if you would like more specific instructions: I'd be happy to post them.

There is a simple formula for figuring out how wide to make the strips on your blocks, as well as the half-square triangles for the corners....especially if you want regular sized blocks to put into a 6 1/2" or 12 1/2" format. In a nutshell, subtract 1/2" from the fussy cut piece. Then subtract that measurement from 6, 9, 12 or 18, whichever gives you a number between 4 and 8. Divide that number by 4, and add 1/2. This will be the size of the strips for the sides of the Hole in the Barn Door block. Go back and take the number again before you added the 1/2. Double it and add 7/8. This is the size of the squares you will need for the half-square triangle corners. Let me know if you would like more specific instructions: I'd be happy to post them.
Labels:
6 1/2: block,
animal fabrics,
fabric ideas,
Hole in the barn door,
novelty fabric,
Novelty prints,
pig fabric,
quilt blog,
quilt inspiration,
quilting,
quilts,
theme quilts
Subscribe to:
Posts (Atom)