Showing posts with label quilts. Show all posts
Monday, November 7, 2011
Easy, Pretty, Vintage-Look Doll Quilt
This little quilt was a lot of fun. I'd been given some small pieces of 30's inspired fabric at about the same time my daughter fell in love with American Girl dolls. Once she "adopted" Samantha, of course we needed a doll quilt for her!
The quilt is based on 2 blocks, each miniaturized to 3" finished. The first block is a scrappy 9-patch. Small scraps of fabric were cut into 1 1/2" strips and sewn together in sets of 3. Sometimes there was very little fabric for the third strip, but that was OK with me...it just added to the "scrappiness!"
The sewn-together strips were rotary cut into 1 1/2" strips. Then, these 3-piece strips were arranged in groups of 3, and sewn together. Because they were so small, I finger pressed the seams to make them all nestle together when being sewn together.
Labels:
American Girl doll quilt,
easy quilts,
miniature quilt,
quilt designs,
quilt photos,
quilts,
stash,
stash ideas
Tuesday, October 18, 2011
Some Ideas for the Novelty Fabric You Couldn't Resist!
I'm guilty! I bought an adorable novelty print of happy pigs on a farm. One is just cuter than the next! But what to do with it? I thought and thought, and came up with the idea of doing Hole in the Barn Door blocks using greens on the outer edges and woody print fabrics on the inside borders. I decided to do blocks of different sizes....either 6 1/2", 9 1/2", 12 1/2" or 18 1/2" so they would all go together. If I needed additional fabric filler, I was going to use a complimentary apple print, and reds and greens (including a red check to match one of the piggie's bibs!). I may put some Flying Geese blocks in, too. Here are a couple of the blocks:

There is a simple formula for figuring out how wide to make the strips on your blocks, as well as the half-square triangles for the corners....especially if you want regular sized blocks to put into a 6 1/2" or 12 1/2" format. In a nutshell, subtract 1/2" from the fussy cut piece. Then subtract that measurement from 6, 9, 12 or 18, whichever gives you a number between 4 and 8. Divide that number by 4, and add 1/2. This will be the size of the strips for the sides of the Hole in the Barn Door block. Go back and take the number again before you added the 1/2. Double it and add 7/8. This is the size of the squares you will need for the half-square triangle corners. Let me know if you would like more specific instructions: I'd be happy to post them.

There is a simple formula for figuring out how wide to make the strips on your blocks, as well as the half-square triangles for the corners....especially if you want regular sized blocks to put into a 6 1/2" or 12 1/2" format. In a nutshell, subtract 1/2" from the fussy cut piece. Then subtract that measurement from 6, 9, 12 or 18, whichever gives you a number between 4 and 8. Divide that number by 4, and add 1/2. This will be the size of the strips for the sides of the Hole in the Barn Door block. Go back and take the number again before you added the 1/2. Double it and add 7/8. This is the size of the squares you will need for the half-square triangle corners. Let me know if you would like more specific instructions: I'd be happy to post them.
Labels:
6 1/2: block,
animal fabrics,
fabric ideas,
Hole in the barn door,
novelty fabric,
Novelty prints,
pig fabric,
quilt blog,
quilt inspiration,
quilting,
quilts,
theme quilts
Wednesday, October 12, 2011
What to Do with That Novelty Fabric You Couldn't Resist!
You know you're guilty! You bought a half a yard of a fall novelty fabric, and it sits there and sits there because you have no idea what to do with it! All I can say is, let it speak to you and tell you what to make with it!
In the small quilt above, a fall novelty print forms the basis of a sweet wallhanging. It was cut to 18 1/2" by 12 1/2". Those measurements were chosen because of the wide availability of free 6 1/2" block patterns.
Labels:
easy quilts,
fabric,
fall,
fall fabric,
fall quilts,
log cabin,
maple leaf block,
novelty fabrics,
novelty print,
quilt blog,
quilter,
quilting,
quilts,
stash,
yellow fabric
What Makes Stack and Whack Quilts So Much Fun!
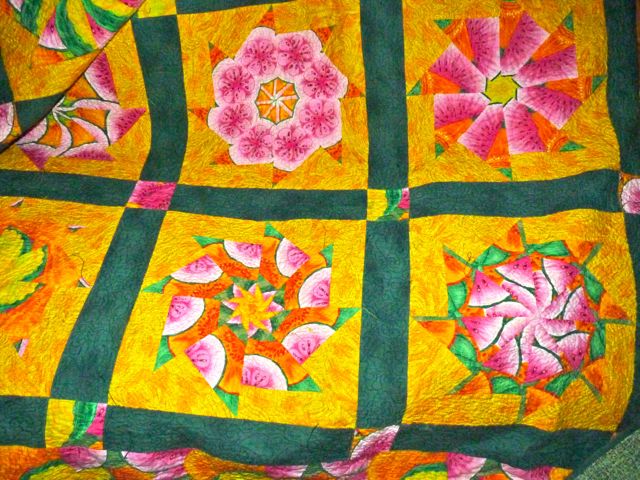
If you love surprises, Stack and Whack quilts are a hoot! For those of you who aren't familiar with them, the premise is simple...you take lots and lots of fabric (sometimes hideous!) and stack identical pieces exactly on top of each other. You then cut squares or triangles and sew them together to form pinwheel designs. What makes them fun is that you often don't know what the block will look like when you finish. Surprise!
Here's one that I did a while ago.. The starter fabric was a huge print with watermelons and cantaloupes on it. My big mistake was not understanding how much contrast you need in a Stack and Whack block. While I love my Watermelon quilt, the yellows and oranges in the melon fabric tend to blend a little too much with the background yellow fabric. It would probably have been better to use dark green for the background and the yellow for the sashing. Oh, well, live and learn! And, enjoy it anyway! Although I still may use some dark green thread to outline each pinwheel to add some contrast!
What do you think? Please comment...and definitely link to photos of Stack and Whack quilts you have made!
Labels:
fabric,
fabric stash,
large prints,
pinwheel quilt,
quilt blocks,
quilt blog,
quilt ideas,
quilter,
quilting,
quilts,
sashing,
stack,
stack and whack,
stack n whack,
stack-n-whack,
stash,
whack
Thursday, October 6, 2011
Sorting Fabrics Into Light and Dark Values
The three fabrics shown here may or may not have a lot in common...all have yellow or orange, as well as some bits of red and light green or turquoise. But one has stripes, one has a single design repeating in diagonal rows, and the third is truly random.They can all be classified as more contemporary fabrics as opposed to vintage prints, and none of them seem like they'd go very well with each other in a single block.
For this project, it may be a little confusing to determine which ones are light and which are dark.
What do you think? Please comment below. I'll post the completed block soon...so you can see how this block came together!
Labels:
birds in the air,
easy quilts,
fabric,
fall,
fall fabric,
fall quilts,
log cabin,
maple leaf block,
novelty fabrics,
novelty print,
quilt blog,
quilter,
quilting,
quilts,
stash,
yellow fabric
Sunday, October 2, 2011
My "Kaffe Birds in the air Taking Formation" Quilt
This is where I am at now in my quilting. I volunteered to create a pattern for 10" squares for my quilt guild. When I thought about it, I wanted to find a pattern where the would be no waste. I came upon the idea of using a Birds in the Air pattern. Since I have no layer cakes in the house, I took a rotary cutter to my Kaffe Fassett stash, and cut 42 10" squares. My stash never even felt a dent!
Here I show how I laid out the 42 completed blocks in 5 different orientations. My carefully sorting the fabrics from dark to light, and then grouping them, the strong diagonal lines in each block lent themselves to a variety of layouts.
Which is your favorite? I'll tell you which I chose in my next block, along with how to make each block.
Labels:
fabric,
kaffe,
kaffe fassett,
layer cake,
quilt,
quilt blog,
quilt blogs,
quilt design,
quilting,
quilts,
sorting fabric
Subscribe to:
Posts (Atom)